


Bangalore has turned into a mess in past few years. In most aspects! To list a few: traffic, water woos, roads, footpaths, pollution of air, water bodies and piles of garbage on every corner.
This post is not to criticize Bangalore. In fact this is the city I love and that has given me shelter for 10 years now. The city was once know for its gardens and cool weather. But things are changing very fast with more and more people coming into the city for jobs. With increasing population it is obvious there will crunch of resources. But instead of finding alternative we start blaming the BBMP or the Govt. Not once we think how things can be fixed at our end. We can not fix problems like roads and footpaths on our own, but there are things we can do to minimize the damage in few cases.
One of the major problems one sees in Bangalore is piles of garbage spread across every nook and corner. While this might be happening in other cities as well, but having stayed here for a decade I have seen things going worst from bad. I have been to Chennai and Hyderabad but things are not that bad there (I might be wrong as I have been to only small part of these cities). But if we are not careful and continue to be irresponsible, these cities, with growing population will face the same issues. Sooner or later.
Coming back to the topic of this write up, Composting kitchen waste in balcony, can play a vital role in fixing the mess that is on the roads which looks like this:

In March this month I moved to a rented apartment which has three balconies. Until now I used to stay in independent house which did not have a space outside of house where I could think of doing something useful. In the new house, I decided to utilize the space and started studying about composting online. I went through a lot of videos and blogs. I was impressed by one particular video blogger from Bangalore, Vani Murthy. She inspired me a lot. She has been doing composting in something called Khamba pots and educating people about them. I visited a local distributor of Daily Dump. They sell these scientifically designed set of pots to be used for composting, in different sizes depending on family member or Kitchen waste a family produces. The cost seemed high for someone like me who does not know anything about composting. Moreover I was not sure I would keep my commitment and continue to do it. So I decided to invent something and started same procedure what they do at DailyDump in medium sized pot used for planting tress. This experiment turned out to be successful. So I explored more online and came up with a permanent and low cost solution to waste management.
This blog is about the same. I have been doing composting since last 4 months and its the best thing I have done so far which interests me (my Job does not drive me anymore, its just to keep my needs :D). Lets start to learn then!
What we need:
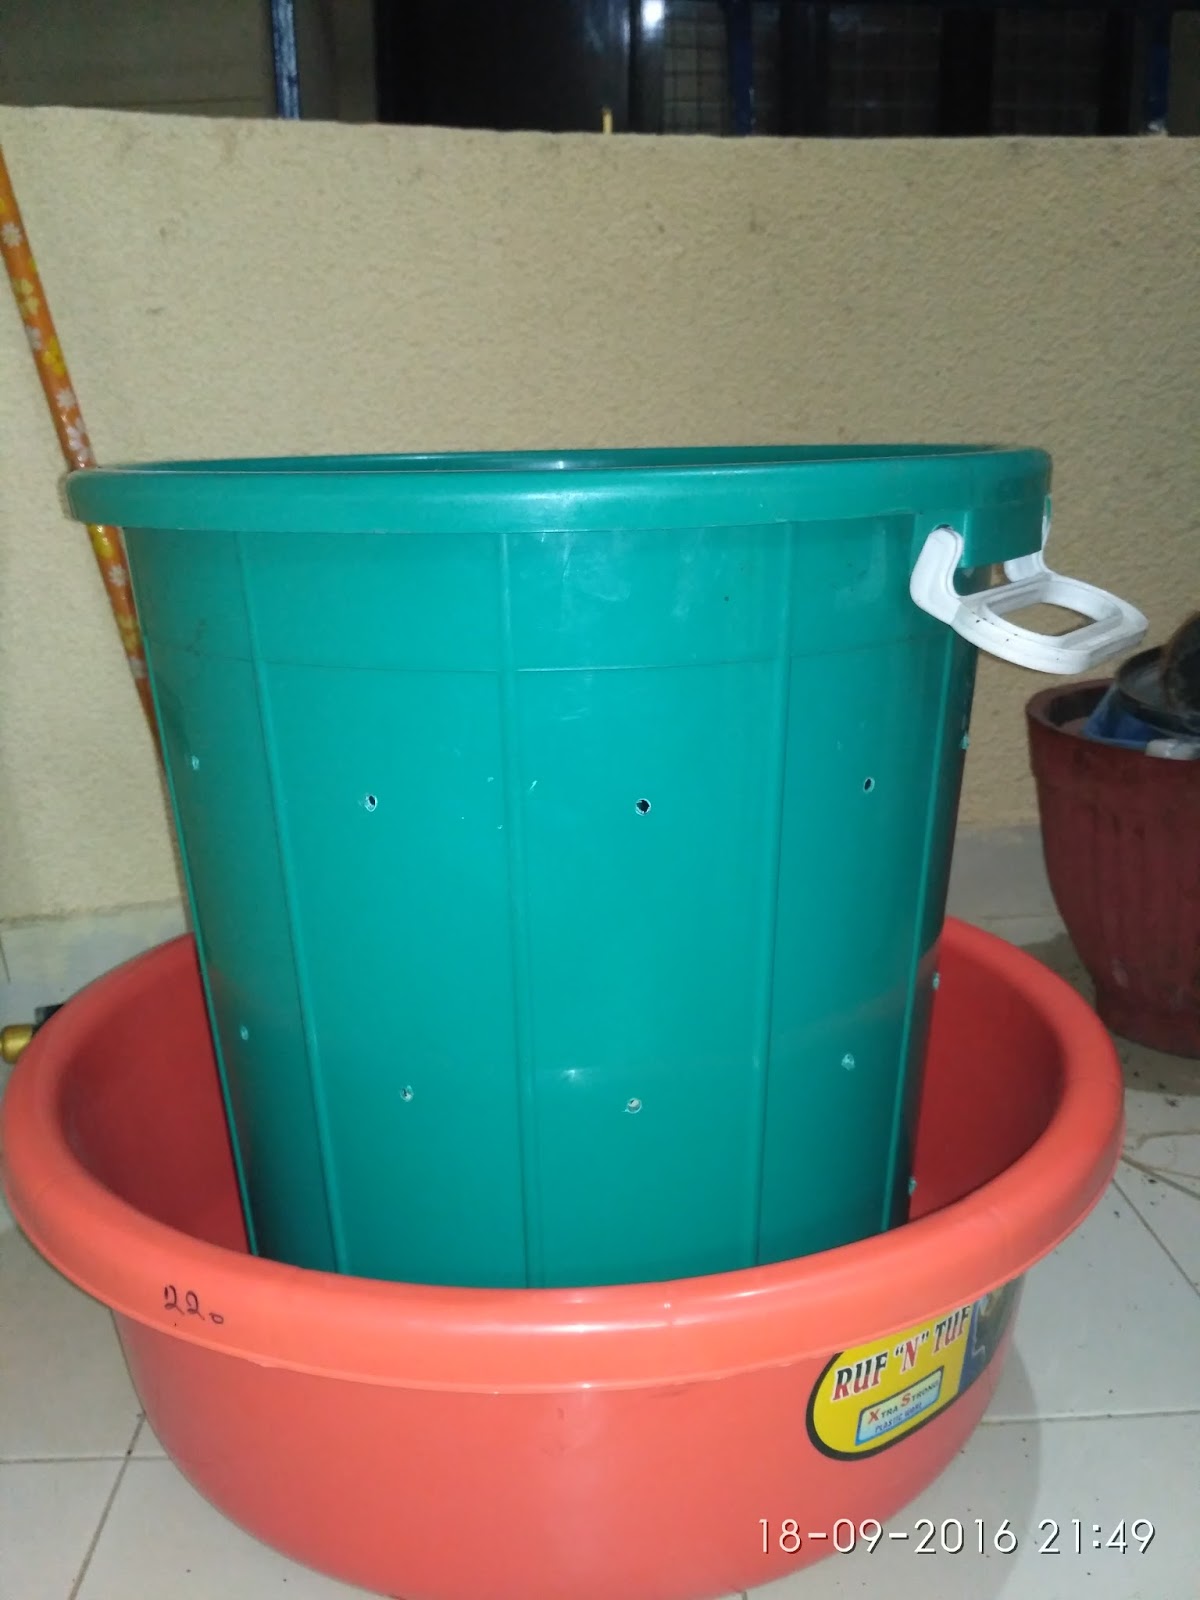
1. A container with a cap with close to 40 liter capacity.
2. A tub to collect the Black soldier fly maggots falling from the compost container and also to mix the coompost every 4 days


3. Cocopit (Crushed coconut tree remains)

4. A packet of Compost itself
5. Dry leaves or paper shreds to absorb the extra water in the waste and to cover the bin.
6. Gloves and other tools
7. Buy or borrow a drill machine.
8. Neem leaves or Neem leave powder.
Procedure:
1. Drill the container from all sides, bottom and top (its cap) like shown in below image. This to to have sufficient air circulation needed for the process. The excess water if any should come out from bottom.

2. Segregate your kitchen waste. You can add anything from your kitchen except milk, water, non veg food (chicken etc), plastic. Cut the vegetable waste into small pieces as this helps speed up the process. Remove excess water from curries and add the remains.
3. If you are doing this for the first time (new setup), make a bedding of dry leaves or paper shreds or cardboard shreds to absorb the extra water that accumulates at bottom. In the other bottom tub mix your kitchen waste with more paper shreads or dry leaves, cocopit (amount same as kitchen waste), and some ready made compost. Mix this well with hands (dont forget to put on the gloves) and dump in the main container.

4. Once done cover this with a layer of the dry leaves or news paper so that no flies enter and no smell comes out.

5. Repeat step 2 and 3 every time you have a fresh kitchen waste. Don't forget to cover the container with dry leaves like shown above.
6. Mix everything every 4-5 day so that it gets enough air which is very much necessary. and cover again top with dry leaves. One can make a round shaped cap from news paper of cardboard to be placed on top permanently.


This post is not to criticize Bangalore. In fact this is the city I love and that has given me shelter for 10 years now. The city was once know for its gardens and cool weather. But things are changing very fast with more and more people coming into the city for jobs. With increasing population it is obvious there will crunch of resources. But instead of finding alternative we start blaming the BBMP or the Govt. Not once we think how things can be fixed at our end. We can not fix problems like roads and footpaths on our own, but there are things we can do to minimize the damage in few cases.
One of the major problems one sees in Bangalore is piles of garbage spread across every nook and corner. While this might be happening in other cities as well, but having stayed here for a decade I have seen things going worst from bad. I have been to Chennai and Hyderabad but things are not that bad there (I might be wrong as I have been to only small part of these cities). But if we are not careful and continue to be irresponsible, these cities, with growing population will face the same issues. Sooner or later.
Coming back to the topic of this write up, Composting kitchen waste in balcony, can play a vital role in fixing the mess that is on the roads which looks like this:

In March this month I moved to a rented apartment which has three balconies. Until now I used to stay in independent house which did not have a space outside of house where I could think of doing something useful. In the new house, I decided to utilize the space and started studying about composting online. I went through a lot of videos and blogs. I was impressed by one particular video blogger from Bangalore, Vani Murthy. She inspired me a lot. She has been doing composting in something called Khamba pots and educating people about them. I visited a local distributor of Daily Dump. They sell these scientifically designed set of pots to be used for composting, in different sizes depending on family member or Kitchen waste a family produces. The cost seemed high for someone like me who does not know anything about composting. Moreover I was not sure I would keep my commitment and continue to do it. So I decided to invent something and started same procedure what they do at DailyDump in medium sized pot used for planting tress. This experiment turned out to be successful. So I explored more online and came up with a permanent and low cost solution to waste management.
This blog is about the same. I have been doing composting since last 4 months and its the best thing I have done so far which interests me (my Job does not drive me anymore, its just to keep my needs :D). Lets start to learn then!
What we need:
1. A container with a cap with close to 40 liter capacity.
2. A tub to collect the Black soldier fly maggots falling from the compost container and also to mix the coompost every 4 days

3. Cocopit (Crushed coconut tree remains)

4. A packet of Compost itself
5. Dry leaves or paper shreds to absorb the extra water in the waste and to cover the bin.
6. Gloves and other tools
7. Buy or borrow a drill machine.
8. Neem leaves or Neem leave powder.
Procedure:
1. Drill the container from all sides, bottom and top (its cap) like shown in below image. This to to have sufficient air circulation needed for the process. The excess water if any should come out from bottom.

2. Segregate your kitchen waste. You can add anything from your kitchen except milk, water, non veg food (chicken etc), plastic. Cut the vegetable waste into small pieces as this helps speed up the process. Remove excess water from curries and add the remains.
3. If you are doing this for the first time (new setup), make a bedding of dry leaves or paper shreds or cardboard shreds to absorb the extra water that accumulates at bottom. In the other bottom tub mix your kitchen waste with more paper shreads or dry leaves, cocopit (amount same as kitchen waste), and some ready made compost. Mix this well with hands (dont forget to put on the gloves) and dump in the main container.

4. Once done cover this with a layer of the dry leaves or news paper so that no flies enter and no smell comes out.

5. Repeat step 2 and 3 every time you have a fresh kitchen waste. Don't forget to cover the container with dry leaves like shown above.
6. Mix everything every 4-5 day so that it gets enough air which is very much necessary. and cover again top with dry leaves. One can make a round shaped cap from news paper of cardboard to be placed on top permanently.


7. If you have very small amount of kitchen waste, just dig through the current layer and stuff is inside and mix it. Cover it.
8. Place the container in the tub and keep the tub in a corner. Cover it with cap (You can avoid covering with plastic cap as it causes lot of warmth inside and water.)
9. After few days (2 weeks) the breakdown must have taken place but not fully. The compost will give birth to maggots. Do not get panicked as I did. They are our friends. If they are too much in number add some Neem leaves or Neem leave powder and mix it well.
10. The maggots will initially be tiny white ant size worms which will grow in size to be close to half centimeter. They will try and come out of hole that are made in the container, Every 3-4 days collect these maggots in a small container and dispose them off in bushes near your garden. Birds like them. And some lucky ones will becomes flies. Second picture courtesy dailydump.org.


12. On an average its takes 6-8 weeks for the wet waste to become a compost. If the container is filled make another setup and let the first one turn into complete compost and do not add anything to it. Keep mixing the old compost every week after this until it breaks down to small black compost and dries up.


13. When your second compost container is filled your first compost is ready to go to garden and to be used for new cycle of compost.

Precautions:
1. DO NOT add water. Keep the container such that no rain water enters inside. You don't want rain water enter inside. This will cause lot of mess.
2. No non veg food items like bones, flesh remains etc,
3. No bio waste like kids potty or animal poop. Its a strong No No.
4. Keep observing the changes as it helps learn the whole process.
3. If you are troubled with flies and maggots refer to Daily Dump Troubleshoot
What are the benefits:
1. No wet waste goes out of house. You no longer crib about Govt not doing enough as you realize you are the one who is doing it.
2. You get compost for garden
3. You are helping stop the spread of diseases because of landfills
I have been doing this for a while and produced some compost. There is different kind of satisfaction to see the nature at work. To realize that you not leaving carbon footprint behind. You are doing your bit not allowing your waste go on roads or end up in land fills.
Every task at beginning looks tough. But as you do it more often you master it and it becomes a daily routine. Many people are worried to put there hands in the waste they themselves produce, but expect other people to carry it and segregate it. They must realise the real fun is in being self dependent.
And last, Be patient. You efforts will yield good results. And feel proud when you take a stroll next time in your city. :)
NOTE: I will keep updating the blog in future with my finds and changes in case someone encounters weird results with this procedure. As of now I have not seen any problem.
Dear Pramod,
ReplyDeleteI have been in search of any such indigenous process and I can say that I have found it! Let me give a try. I may be pestering you my doubts as and when I encounter them. The great thing I underlined is to have patience!
Thank you so much.
Because compost is stored directly on the farm it’s convenient, quick, and easy to access for application or sale and it will sit safely in storage until you decide to do so.
ReplyDelete